


Sometimes it’s desired to have a minimum price schedule for service agreements. Many won’t implement this as they find it to be painful to try and setup.
In this blog, we will show a couple pain free ways to handle this within ConnectWise Manage Agreements.
Desired outcome: 5 device (workstation) minimum for Gold Service Agreement.
Method 1: Agreement Product Additions
Step A: Create a White Label product which doesn’t have any integration to your RMM. Add this product to the Agreement Additions with the minimum number desired.
Step B: Add the integration linked RMM product to the Agreement Addition. Include the current count, then include the required minimum amount in the “Less Included” field. This should match the number added to the White Label product from Step A.
This method will produce two line items on the invoice (If detailed). The White Glove product will bill for the minimum amount and the RMM Integrated product will account for anything over the minimum set, allowing for full automation of your agreements.
Pros: This could set this up from within the quoting systems template, adding all required products during conversion.
Cons: Additional line on invoices. Could create invoicing questions.
Method 2: Pricing Schedule List
The pricing schedule list is a method for handling pricing structures on the back end, only visible at the invoicing point.
Navigate to System > Setup Tables > Pricing Schedule List > Select + to create a new pricing schedule.
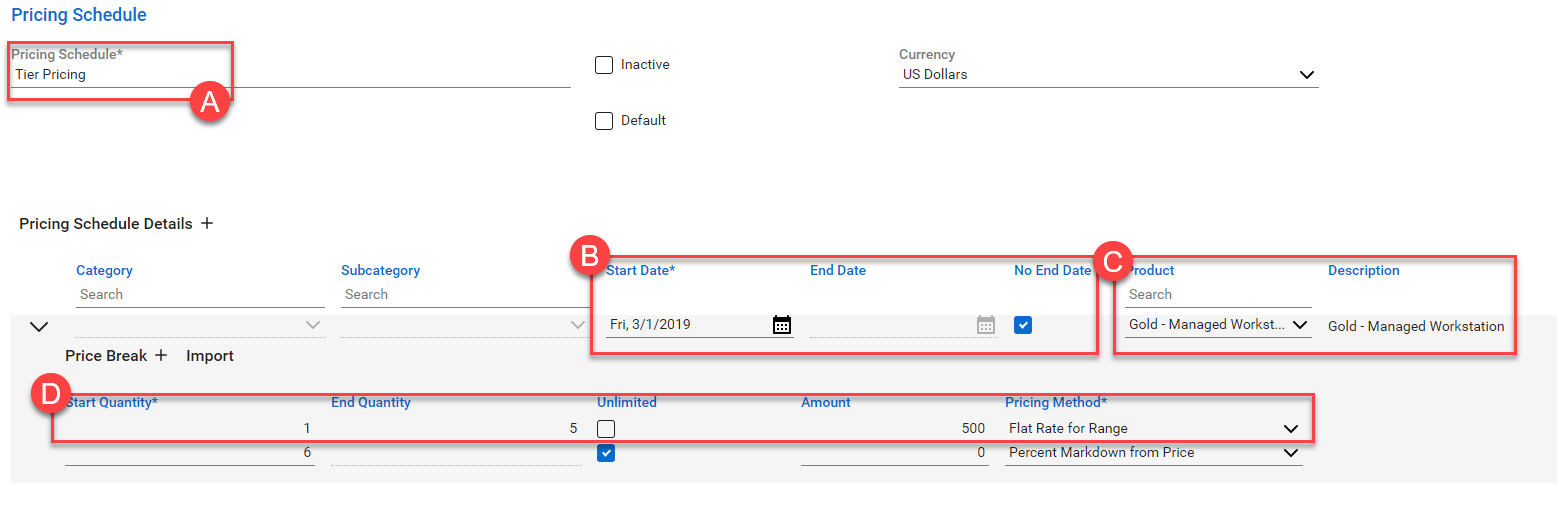
Step A: Name the pricing schedule.
Step B: Create a start date and end date (or No End Date)
Step C: Select the RMM product which the pricing schedule minimum should be applied to.
Step D: Create your price points with the start and end quantity, selecting “Flat Rate for Range” to accomplish the block pricing schedule. (You can have multiple levels if desired.)
The amount entered would be the invoiced price for the block, as in the example shown $500 would be invoiced for Gold Managed Workstations for 1 to 5 workstations. If there are more than 5 Gold Managed Workstations, then the price for the 6th and above would be taken from the actual products retail price.
Save the newly created pricing schedule.
Step E: Select the Company tab located at the top of the Pricing Schedule List. Find the company that this Price Schedule should be linked to and click the check box next to that company. Now From the Actions drop down, select “Set Pricing Schedule”. The Pricing Schedule is now activated for this company.
Pros: Consistent Price Schedules as a pricing schedule can be applied to many companies; setup customized Pricing Schedules per customers.
Cons: Requires manual setup for each new agreement. We suggest adding a note to the Agreement Type’s internal note field to remind that this Price Schedule should be manually applied to this company.

